If you have joined the vcsa to a domain in the authentication tab of your vcsa administrative console, you do not need to add a STS SPN; you can use the machine account to add the identity source of that same domain.
What you do need is to go to your AD DNS and make sure the forward and reverse entries for the new VCSA and your AD have been created, and your VCSA has the proper DNS settings.
pics will come, but I have seen google lead me to believe I have to use a SPN, or that I have to add it as a AD LDAP source. None of these are needed if you already joined the VCSA to the domain; you could use them for additional domains.
Monday, December 8, 2014

Sunday, December 7, 2014
Nested ESXi in a physical ESXi quick sheet
First of all, hardware has to meet some minimum requirements
- your CPU should have VT (google the CPU, see the advanced technologies at the bottom, example: http://ark.intel.com/products/52214)
- enable CPU VT option in BIOS (if you just did a BIOS update, check it again)
- this machine should have enough RAM for the physical ESXi and the nested ESXi (especially if you want to run more than one nested host to test all features of vcenter) and the VMs. I'd say 16GB is conservative, but definitely doable.
Recommendations so the VMs perform well
- SSD (if you have both SSD and spinning, move VMs you aren't using as much to the slower disk)
- at least 1 cabled gigabit
- plenty of ram
if the physical host is 5.0 and you are deploying nested 5.5
- choose rhel 5 x64 bit as OS when creating the nested ESXi VM
- I honestly only put a 1GB disk. if you need the logs, you can send them elsewhere using syslog.
- I choose vmxnet3 - intel should work too
- make sure you give it more ram (the default for rhel 5 is 1GB and the installer would fail)
- add the string vhv.allow = "TRUE" to /etc/vmware/config in your Physical ESXi 5.0 host (with vi through SSH, for example)
- your CPU should have VT (google the CPU, see the advanced technologies at the bottom, example: http://ark.intel.com/products/52214)
- enable CPU VT option in BIOS (if you just did a BIOS update, check it again)
- this machine should have enough RAM for the physical ESXi and the nested ESXi (especially if you want to run more than one nested host to test all features of vcenter) and the VMs. I'd say 16GB is conservative, but definitely doable.
Recommendations so the VMs perform well
- SSD (if you have both SSD and spinning, move VMs you aren't using as much to the slower disk)
- at least 1 cabled gigabit
- plenty of ram
if the physical host is 5.0 and you are deploying nested 5.5
- choose rhel 5 x64 bit as OS when creating the nested ESXi VM
- I honestly only put a 1GB disk. if you need the logs, you can send them elsewhere using syslog.
- I choose vmxnet3 - intel should work too
- make sure you give it more ram (the default for rhel 5 is 1GB and the installer would fail)
- add the string vhv.allow = "TRUE" to /etc/vmware/config in your Physical ESXi 5.0 host (with vi through SSH, for example)
Thursday, November 20, 2014
F5 replacement useful commands
some F5 commands - v11.
-Shutting down that F5 box:
plagiarized from here , SSH and run
Actually if you want them to shutdown then power off use the following.
shutdown -hP now
h means halt.
P means power off.
- Restore another's device full configuration (even all network and mgmt ip address, all vlans, virtual servers, etc) without running into licensing issues (useful for RMA or DR). This is the condensed form of this article. I assume you can access the new device through web/ssh by the mgmt IP.
1. Through SSH/SCP, copy the .ucs file you want to restore (default is /var/local/ucs)
2. leave a SSH session open to the new mgmt IP
3. turn off the other device (see above)
4. in the SSH session, run tmsh and then load /sys ucs <path/to/UCS_file> no-license. You can "complete with tab" when putting the filename to make double sure.
5. once the file is processed, your old mgmt IP will begin responding, and your new mgmt IP will go offline
6. change cables from old to new device
7. check. Sometimes a vip needs to be disabled and enabled for stuff to work (arp?)
8. think highly of yourself
- Clear a device to factory settings (except mgmt IP)
I assume you figured out how to get the mgmt IP setup right. Now go here . Really. It's short and sweet.
-Shutting down that F5 box:
plagiarized from here , SSH and run
Actually if you want them to shutdown then power off use the following.
shutdown -hP now
h means halt.
P means power off.
- Restore another's device full configuration (even all network and mgmt ip address, all vlans, virtual servers, etc) without running into licensing issues (useful for RMA or DR). This is the condensed form of this article. I assume you can access the new device through web/ssh by the mgmt IP.
1. Through SSH/SCP, copy the .ucs file you want to restore (default is /var/local/ucs)
2. leave a SSH session open to the new mgmt IP
3. turn off the other device (see above)
4. in the SSH session, run tmsh and then load /sys ucs <path/to/UCS_file> no-license. You can "complete with tab" when putting the filename to make double sure.
5. once the file is processed, your old mgmt IP will begin responding, and your new mgmt IP will go offline
6. change cables from old to new device
7. check. Sometimes a vip needs to be disabled and enabled for stuff to work (arp?)
8. think highly of yourself
- Clear a device to factory settings (except mgmt IP)
I assume you figured out how to get the mgmt IP setup right. Now go here . Really. It's short and sweet.
Tuesday, October 21, 2014
date windows updates were installed
You have a need to present the dates of installed updates in Windows Servers. WSUS gives you which patches, but not when.
2003:
if you haven't used pstools, please download and read and use. http://technet.microsoft.com/en-us/sysinternals/bb896649.aspx
psinfo -h \\remotecomputer > d:\path\server.txt
the > sends the output to a file you define.
you can omit \\remotecomputer if you are running locally
2008:
use this wmic script
wmic qfe list full /format:htable > d:\path\server.htm
the > sends the output to a file you define.
2003:
if you haven't used pstools, please download and read and use. http://technet.microsoft.com/en-us/sysinternals/bb896649.aspx
Use psinfo:
the > sends the output to a file you define.
you can omit \\remotecomputer if you are running locally
2008:
use this wmic script
wmic qfe list full /format:htable > d:\path\server.htm
the > sends the output to a file you define.
Saturday, July 5, 2014
Nested ESXi lab - part 1 - getting the right downloads for the main site
I reviewed what I want to accomplish in this lab in
http://learning-in-it.blogspot.com/2014/07/nested-esxi-lab-design-thoughts.html
Now I get to do it.
The first site will be done in VMware workstation v9. I use this version because when I got the VCP certification, they gave me a free license. However, you can buy or get a trial license from the vmware.com site. I believe all trials are for 60 days.
I am using the linux version - just because i'm trying to learn linux, and there's no better way to learn than doing - but you can probably do the same things in the windows version. If you have problems running the linux version, please see this post http://learning-in-it.blogspot.com/2014/05/installing-vmware-workstation-9-in.html
First let's download the appropriate ISOs:
VMware
You'll need to setup a free account if you don't have one already. I will attach screenshots since some friends have asked me exactly what to download.
In my case I will enroll in a vSphere with Operations Management (also called vSOM) trial.

Here is where you create or login to your MyVMware account (usual activation steps required)

Make a note of the evaluation license key and let's download the required packages.

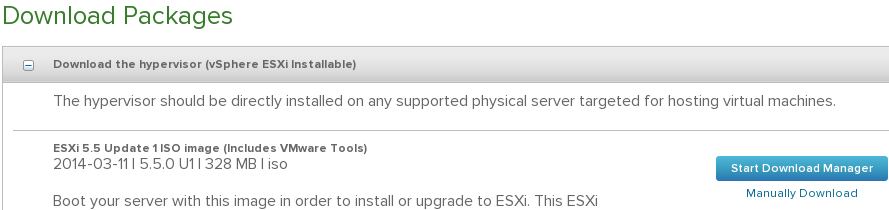
ESXi - this iso is typically around 300MB. This lab will be done on ESXi5.5. I will be actually using an older one so we can patch it once installed, but here is the image of how it looks
vCenter - this is the windows installer, we will use it on the remote site. This is typically a 3GB ISO. I will use an older version and then upgrade it with the newest as part of the lab. The windows C# vsphere client is included in this ISO, so there is no need to download it separately.

vCenter appliance. Download either the one .ova file, or the very small ovf file and both disks (check for vmdk). Why both options? OVA is a tar of an OVF. Workstation can open ovf and vmdk's directly, but it will need to unzip the OVA.

Operations management is it's own OVA file. This will be the last one we download for now.

Openfiler
This is basically linux based SAN software. For the main site, I will use it as a iSCSI target. It's simple and small enough (500MB download) for my purposes. I will change this in the recovery site and use NFS instead there for study purposes.
https://www.openfiler.com/
We will download the v2.99 ISO and create our own VM. i know there's a prepackaged one there, but see what I do and then decide for yourself. Cick on the community edition and the download arrow.

don't forget to read the system requirements
https://www.openfiler.com/products/system-requirements
Microsoft
We will download a trial of Server 2012 R2 to setup AD. I actually want to test an installation with no GUI for the recovery site, see how managing that works. Make sure you choose the ISO download option. You will need a microsoft related account to register.

Always important to read the system requirements http://technet.microsoft.com/library/dn303418.aspx . Note also that this trial runs for 180 days.
We will also download a SQL Server trial. We will use it with the windows based vCenter in our recovery site. VMware vCenter includes an embedded, free edition of MS SQL, but nobody uses that in a real company - it is very limited. You should involve your company's DBA to take care of your vCenter SQL DB and have it run as best as it can. Installation is tougher this way, but when you work with your DBA and tell him dbo rights are really required, you will understand why.
Important caveat - as of this writing, SQL server 2014 is not in the VMware inter-operatibility matrix - 2012 is the newest supported one.

This is the link for the 2012 trial http://www.microsoft.com/en-us/download/details.aspx?id=29066
Also read the system requirements http://msdn.microsoft.com/library/ms143506(v=SQL.110).aspx
Linux
We need some VMs. We already have the 2012 R2 installer, but we should also practice Linux. My workstation runs on Fedora, but in an effort to branch out, I will use the Ubuntu 14.04 LTS server
http://www.ubuntu.com/download/server
Al of these downloads are upwards of 12GB, so make sure you have them ready before starting the next step.
http://learning-in-it.blogspot.com/2014/07/nested-esxi-lab-design-thoughts.html
Now I get to do it.
The first site will be done in VMware workstation v9. I use this version because when I got the VCP certification, they gave me a free license. However, you can buy or get a trial license from the vmware.com site. I believe all trials are for 60 days.
I am using the linux version - just because i'm trying to learn linux, and there's no better way to learn than doing - but you can probably do the same things in the windows version. If you have problems running the linux version, please see this post http://learning-in-it.blogspot.com/2014/05/installing-vmware-workstation-9-in.html
First let's download the appropriate ISOs:
VMware
You'll need to setup a free account if you don't have one already. I will attach screenshots since some friends have asked me exactly what to download.
In my case I will enroll in a vSphere with Operations Management (also called vSOM) trial.
Here is where you create or login to your MyVMware account (usual activation steps required)
Make a note of the evaluation license key and let's download the required packages.
ESXi - this iso is typically around 300MB. This lab will be done on ESXi5.5. I will be actually using an older one so we can patch it once installed, but here is the image of how it looks
vCenter - this is the windows installer, we will use it on the remote site. This is typically a 3GB ISO. I will use an older version and then upgrade it with the newest as part of the lab. The windows C# vsphere client is included in this ISO, so there is no need to download it separately.
vCenter appliance. Download either the one .ova file, or the very small ovf file and both disks (check for vmdk). Why both options? OVA is a tar of an OVF. Workstation can open ovf and vmdk's directly, but it will need to unzip the OVA.
Operations management is it's own OVA file. This will be the last one we download for now.
This is basically linux based SAN software. For the main site, I will use it as a iSCSI target. It's simple and small enough (500MB download) for my purposes. I will change this in the recovery site and use NFS instead there for study purposes.
https://www.openfiler.com/
We will download the v2.99 ISO and create our own VM. i know there's a prepackaged one there, but see what I do and then decide for yourself. Cick on the community edition and the download arrow.
don't forget to read the system requirements
https://www.openfiler.com/products/system-requirements
Microsoft
We will download a trial of Server 2012 R2 to setup AD. I actually want to test an installation with no GUI for the recovery site, see how managing that works. Make sure you choose the ISO download option. You will need a microsoft related account to register.
Always important to read the system requirements http://technet.microsoft.com/library/dn303418.aspx . Note also that this trial runs for 180 days.
We will also download a SQL Server trial. We will use it with the windows based vCenter in our recovery site. VMware vCenter includes an embedded, free edition of MS SQL, but nobody uses that in a real company - it is very limited. You should involve your company's DBA to take care of your vCenter SQL DB and have it run as best as it can. Installation is tougher this way, but when you work with your DBA and tell him dbo rights are really required, you will understand why.
Important caveat - as of this writing, SQL server 2014 is not in the VMware inter-operatibility matrix - 2012 is the newest supported one.
This is the link for the 2012 trial http://www.microsoft.com/en-us/download/details.aspx?id=29066
Also read the system requirements http://msdn.microsoft.com/library/ms143506(v=SQL.110).aspx
Linux
We need some VMs. We already have the 2012 R2 installer, but we should also practice Linux. My workstation runs on Fedora, but in an effort to branch out, I will use the Ubuntu 14.04 LTS server
http://www.ubuntu.com/download/server
Al of these downloads are upwards of 12GB, so make sure you have them ready before starting the next step.
Nested esxi lab - design thoughts
I will create a lab with 2 sites, one site using VMware Workstation on my laptop and the other will be a physical ESXi host.
In each, we will create nested ESXi v5.5 hosts.
The objectives of this lab are:
1) practice for VCAP-DCA
2) learn and test vSphere replication and SRM
3) learn and test vCops
We will also work with
Active Directory - one ADDC for each site, running in the nested ESXis
iSCSI on the main site with Openfiler running on a VM at the same level as the nested ESXis
NFS on the backup site, with TBD running on a VM at the same level as the nested ESXis
One vcenter will be the appliance and another the windows version, running on the nested ESXis
The hardware we have:
both i7
both 32 gb ram
both have one SSD and one hard disk
communicating over a home wireless 802.11ac (not exactly gigabit, but this simulates commercial WAN links fairly decently)
All will run on temporary licenses.
In each, we will create nested ESXi v5.5 hosts.
The objectives of this lab are:
1) practice for VCAP-DCA
2) learn and test vSphere replication and SRM
3) learn and test vCops
We will also work with
Active Directory - one ADDC for each site, running in the nested ESXis
iSCSI on the main site with Openfiler running on a VM at the same level as the nested ESXis
NFS on the backup site, with TBD running on a VM at the same level as the nested ESXis
One vcenter will be the appliance and another the windows version, running on the nested ESXis
The hardware we have:
both i7
both 32 gb ram
both have one SSD and one hard disk
communicating over a home wireless 802.11ac (not exactly gigabit, but this simulates commercial WAN links fairly decently)
All will run on temporary licenses.
Friday, July 4, 2014
webm test using gnome screenshot's screencast function
I will document my VCAP studies lab setup for anyone who finds themselves in this position. I also plan to learn vSphere replication and SRM with this lab, using a laptop as the production site and a desktop as the recovery site.
Since I switched to Linux less than a year ago, i've found different ways to solve the same problems I had in windows. The prt scn (print screen) button does not work by default - you have to install a tool for it. A google seach recommends a tool called Shutter; I had already installed GNOME Screenshot.
While searching for he hot keys, I found a feature that interested me in the GNOME Screenshot tool called Screencast.
https://help.gnome.org/users/gnome-help/stable/screen-shot-record.html.en
This basically allows you to take a small video of what you are doing. It stores the files as .webm - the HTML5 video format that is supported by all modern browsers.
So, here is my first webm embedded video in a blog post - let's see how it looks.
webm test
Since I switched to Linux less than a year ago, i've found different ways to solve the same problems I had in windows. The prt scn (print screen) button does not work by default - you have to install a tool for it. A google seach recommends a tool called Shutter; I had already installed GNOME Screenshot.
While searching for he hot keys, I found a feature that interested me in the GNOME Screenshot tool called Screencast.
https://help.gnome.org/users/gnome-help/stable/screen-shot-record.html.en
This basically allows you to take a small video of what you are doing. It stores the files as .webm - the HTML5 video format that is supported by all modern browsers.
So, here is my first webm embedded video in a blog post - let's see how it looks.
webm test
good news - it runs as advertised. bad news is the resolution sucks, and it grabs all the desktop (in my case, 2 screens). I will update this when I find a solution where 1) i can specify what's recorded, instead of all the desktop 2) i can read what's recorded.
Subscribe to:
Posts (Atom)